
Compared to the schematic diagrams of most cutting-edge technological devices, solar panel wiring diagrams are actually remarkably simple.
Far less complicated than the instructions for putting together a chair from Ikea, for example.
However, just because connecting multiple PV modules together to create a solar panel array is relatively straightforward, it’s absolutely essential that you get it right.
Wiring solar panels together incorrectly can lead to damaging or destroying valuable components — it can even be life-threatening.
The total output voltage and current of your array are determined by how you connect the individual PV modules to each other and to the solar inverter, charge controller, or portable power station.
Even if you don’t do any harm, a smart solar panel wiring plan will optimize performance and maximize the return on your investment.
Read on to find out more about solar panel connection diagrams and how to wire PV modules to achieve the best performance based on your unique installation requirements.
Understanding Solar Panel Connection Diagrams
Most modern photovoltaic systems for residential or portable use don’t actually require much “wiring.”
At least not in the traditional sense of soldering circuits together.
The majority of solar panels and balance of system components use standardized connectors and cables, such as the Universal Solar Connector.
But just because you don’t need to bust out the soldering iron doesn’t mean you don’t have some crucial decisions to make.
Connecting PV modules in series and parallel are the two basic options, but you can also combine series and parallel wiring to create a hybrid solar panel array.
Some solar panels have microinverters built-in, which impacts how you connect the modules together and to your balance of system.
What Are They?
Solar panel diagrams are graphic representations of the connections you should make between each PV module and other components of the solar power system, including:
- Solar inverter
- Charge controller
- Solar battery
- Battery Management System
- Storage inverter
- Smart Home Panel
- Transfer switch
- Bidirectional electric or smart meter (for grid-tied solar panel systems)
Why Are They Important?
Remember the saying, “Measure twice and cut once?”
Detailed specifications with diagrams for reference help you do that for electronics.
Diagrams are the best way to plan out the configuration of your solar panel array and balance of system before you start generating potentially hazardous high-voltage electricity.
That way, you can make sure it works on paper first.
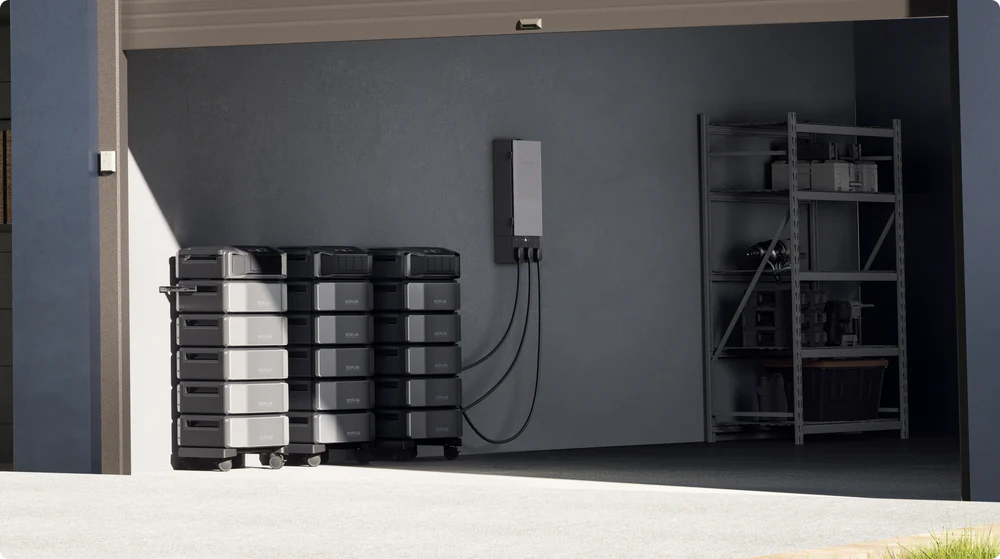
All-in-one solar generators like EcoFlow DELTA Pro 3 contain all of the balance of system components built-in to one portable box.
But if you’re building a DIY solar system with separate components from different manufacturers, well-thought-out wiring diagrams are even more essential.
Cross-compatibility amongst components from various third-party manufacturers is far from guaranteed.
One wrong connection and — best case scenario — your solar power system won’t work.
From there, it’s likely to get worse.
What Do They Look Like?
What solar panel diagrams look like varies widely depending on the complexity of the system.
If you’re using an EcoFlow DELTA Pro with 3 x 400W portable solar panels, the diagram is simple.

You simply connect each panel together in series and then plug them into the Solar Charge Input.
On the other hand, if you’re connecting 42 x EcoFlow 400W rigid solar panels to 3 x DELTA Pro Ultra Inverters + Home Backup batteries, the diagram will be considerably more complicated.
For solar panel arrays with more than a few panels, you’re going to need to take the particulars of your installation area into account to optimize performance.
At the very least, you’ll have to decide between series vs. parallel connections or a hybrid configuration that utilizes both.
Series vs. Parallel Stringing
Generally speaking, PV module arrays with more than 2 or 3 solar panels are more likely to be wired in series rather than parallel.
The physical act of wiring the panels together is virtually identical, but the impact on the voltage and amperage of the electricity output couldn’t be more different.
To figure out why series or parallel stringing is best for you, it’s essential to understand the basics of AC electricity and how the connection types differ.
You can find a detailed article on connecting solar panels in series vs. parallel here.
But here are the basics.
Like many electrical components, solar panels have two terminals: negative and positive.
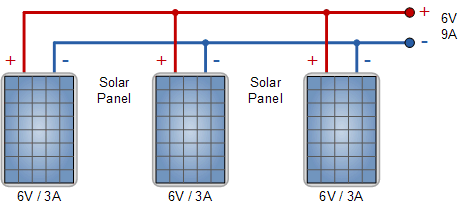
(Source: Alternative Energy Tutorials)
Series connections require you to wire the positive and negative terminals of each panel together in a chain.
The voltage of each panel accumulates to produce the total output, but the wattage and amperage stay the same.
(Source: Alternative Energy Tutorials)
Parallel connections require the opposite: you wire all the positive terminals to the next positive input and negative-to-negative for each panel on the string.
With parallel connections, amperage accumulates, but voltage and wattage do not.
It’s a common misconception that either series or parallel wiring produces more output wattage, but that’s essentially not true.
The total output wattage is minimally affected strictly by wiring in series vs. parallel.
It’s the voltage and amperage that change.
So which is the better option?
That depends on the application.
For example, many RVs and other portable applications use appliances and systems that require 12V power.
If you connect more than one or two 400W portable solar panels in series, the total output voltage will exceed 12V, and you’ll blow a fuse (at best).
However, many grid-tied and off-grid residential solar power systems require high voltage, which can’t be achieved by wiring in PV modules in parallel.
That’s the most fundamental difference between the result of wiring panels in series or parallel, but there are additional pros and cons.
For example:
- The total output of a series-wired array is more likely to be negatively impacted by shade on one or more panel
- High voltage makes series-wired arrays potentially more dangerous to the person installing the system
- Parallel strings are less efficient, and more electricity is lost in transmission to the inverter
- Cabling is significantly more expensive
There are many other subtle implications of choosing between series vs. parallel.
Often, the best choice is both.
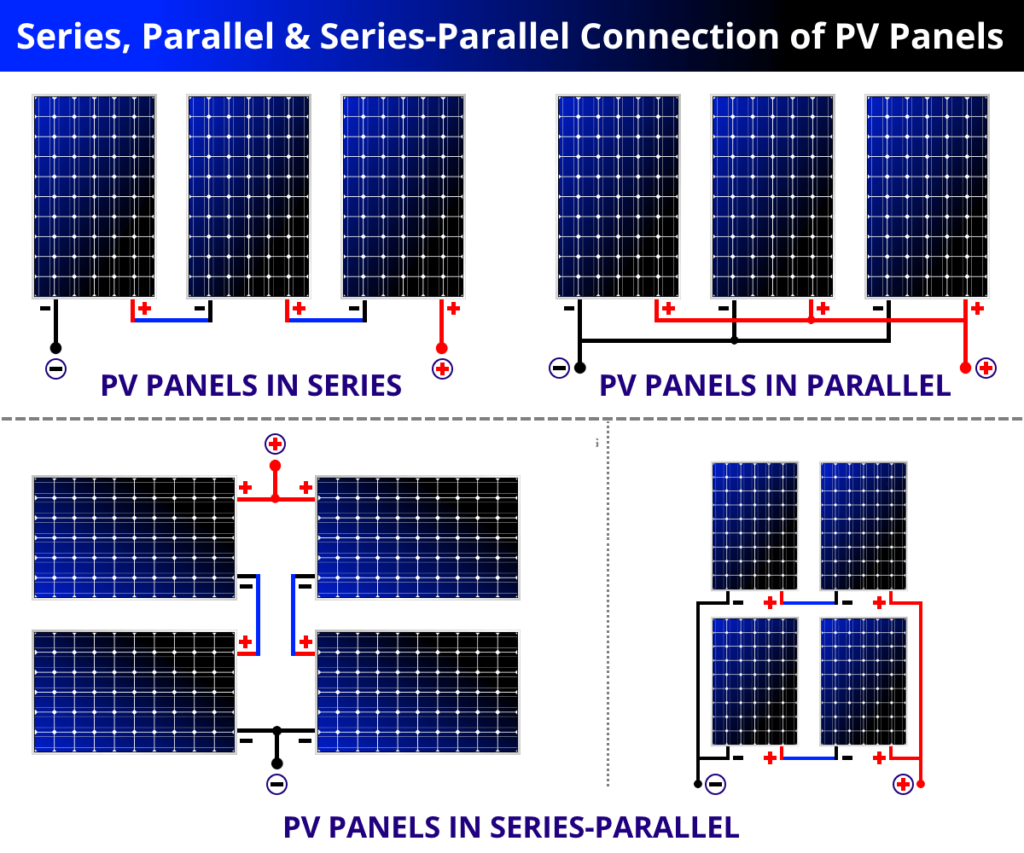
(Source: Electrical Technology)
By combining parallel and series connections in a hybrid wiring configuration, you can address issues like shade and high voltage to maximize your electricity output and performance.
Hybrid connections are often the optimal choice for larger solar panel arrays.
Typically, you’ll work with a professional installer who will assess your installation location and come up with a wiring plan that optimizes PV module performance.
Hiring a reputable installer may cost you more money in the short term, but maximizing the electricity generation potential of your solar panel array will significantly shorten your solar payback period and increase your return on investment.
Depending on your location, you may be eligible for government incentives that help defray the cost of a professional installation.
For example, the 30% Federal Solar Tax Credit provides a credit of 30% of the total purchase and installation cost of an eligible solar power system against your federal income tax liability.
Different Configurations for Solar Panel Wiring Diagrams
Traditional residential solar panel systems use a string inverter: multiple PV modules are connected to one another and then to a solar inverter or charge controller.
Solar panels with built-in inverters on each unit — also known as microinverters — are a relatively recent innovation, and we’ll cover those in detail below.
String Inverter Systems
As discussed above, string inverter solar panel arrays can be wired together in series or parallel — or a hybrid of both.
Advantages
- Low price
- Mature technology
- Options to increase voltage or current (or both)
Disadvantages
- Failure or decreased performance of a single PV module can impact the electricity generation potential of the total solar panel array
- Susceptibility to shade
Microinverter Systems
All PV modules that capture sunlight and convert it into electricity using the photovoltaic effect produce direct current (DC) power.
In string inverter systems, the combined DC output of the entire solar panel array is transmitted to the solar inverter or charge controller (for off-grid and hybrid solar systems).
The solar inverter converts DC to alternating current (AC or “household” power) for use in your home.
In a solar + storage system, the DC power may be routed to a charge controller initially and stored in a solar battery for later use.
Regardless of whether the balance of system is on-grid, off-grid, or hybrid, an inverter is required to convert DC to AC electricity.
Microinverter solar panels have an inverter built into each individual module.
Instead of the cumulative DC output of multiple solar panels being converted to AC by a single inverter, the conversion takes place at the module level.
One common obstacle to expanding an existing solar panel array is the maximum DC input capacity of the solar inverter. Having the microinverter built-in eliminates this constraint.
Typically, microinverter PV modules are available in series or parallel connection options. Because of how the panels are constructed, you can’t switch a microinverter panel from series to parallel just by changing the wiring between terminals from module to module.
Advantages
- Malfunction or shading of one or more solar panels doesn’t impact the output of working PV modules
- Well-suited for complex installations — such as on a roof with multiple planes
- Fewer regulatory or building code requirements
- Expandability
Disadvantages
- Higher cost
- Hard to repair
- Multiple points of failure
How to Design Your Own Solar Panel Connection Diagram
The complexity of solar panel connection diagrams varies widely based on several factors, including:
- Type of modules (solar panels or shingles)
- Number of PV modules
- Architectural conditions at the installation location
- Environmental conditions at the installation location
Whole home generator systems with dozens of panels may require plans that resemble architectural blueprints more than simple connection diagrams for a handful of PV modules.
Nevertheless, there are some basic steps you should follow, regardless of the complexity of your system.
System Sizing
Every informed solar panel system purchase decision should start with a definitive answer to this question:
How much electricity do you need your solar power system to generate — and for how long?
Here’s how to calculate your total electricity consumption in kWh.
Site Assessment
What are the particulars of your installation location?
How many hours of peak sunlight do you receive on average?
Are you installing panels on a rooftop or the ground?
Do you have any issues with shading from trees, buildings, or other obstructions?
A thorough assessment of your installation site is required to get the most out of your system.
Equipment Selection
What is the rated power output of your PV modules?
Will the total output of your system meet your electricity consumption goals?
What about storage?
Solar panels don’t work at night, so you’ll need either a grid-tied or hybrid solar + storage solution to keep your home up and running after dark.
Also, it’s essential to remember that on-grid systems without solar battery storage DO NOT work during a blackout.
Connection Design
Does series, parallel, or hybrid wiring make the most sense for your electricity production needs?
Are you using a string inverter or modules with microinverters built-in?
The answers to these questions are essential for maximizing your electricity generation potential.
Documentation and Compliance
What are the documentation and regulatory requirements at your location?
Do you need a permit for your solar installation?
As a general rule, grid-tied systems will require permits and inspections. Off-grid systems typically don’t require official approval.
If you’re installing a system that’s eligible for the Residential Clean Energy Credit, you’re probably better off working with a licensed installation professional rather than attempting to do it yourself.
Frequently Asked Questions
Carefully. Solar panel arrays with more than a few PV modules require careful planning that takes into account numerous factors like AC output requirements in voltage and amps, peak sun hour conditions at your installation location, type of solar inverter, and other balance of system components. Generally, string inverter arrays with four or more panels should be wired in series rather than parallel, but a hybrid setup may be best. PV modules with built-in microinverters have completely different requirements.
Final Thoughts
There’s rarely any need to be intimidated by solar panel diagrams.
For portable off-grid power applications, EcoFlow’s RIVER series provides convenient plug-and-play power.
If you’re looking for a whole home generator with a solar panel array of more than a handful of modules, you’re probably better off working with a reputable installer.
Optimizing performance — and ensuring your safety — with large fixed solar panel installations typically requires the assistance of a professional who knows their way around high-voltage electrical systems.
If you are planning to integrate your solar panels with your existing home circuit board and wiring, installation by a licensed professional is legally required.
No matter whether you’re starting out small with solar panels or going all in, EcoFlow has a solution for you.