Table of Contents
Rooftop solar power installations in the US have skyrocketed in popularity in the last decade…
According to the Solar Energy Industry Association, a new solar panel installation occurred every 39 seconds in 2023.
Are you thinking about generating all or part of your household electricity from sunlight?
If so, you’ve probably wondered how home solar panel installation works.
Read on to find out if residential solar power is right for you…
And how to install solar panels, step by step.
Essential Components of a Home Solar Power System
Before we get into the nitty-gritty of how to install solar panels on your rooftop, balcony, or grounds of your property, it’s crucial to understand that photovoltaic modules (PV) — like solar panels and shingles — require additional components to operate.
Professional installers refer to essential parts other than the PV modules as the balance of system (BOS).
BoS components like inverters and solar batteries can be sold separately and wired together with PV modules — but an all-in-one solar generator helps you avoid DIY headaches and issues with cross-compatibility.
Here’s a brief description of all the components you need to make home solar power work.
Photovoltaic Modules
All solar energy systems that generate electricity from sunlight use the photovoltaic effect.
PV modules — like solar panels — use photovoltaic cells to harvest photons from visible light…
Not surprisingly, our Sun is by far Earth’s most significant source.
Over 90% of PV installations worldwide use factory-made silicon wafers — either monocrystalline or polycrystalline — as the primary component in solar cells.
There are other types of solar panels, but they’re rarely used for residential applications.
The photovoltaic material in solar panels is typically covered with tempered glass and framed with aluminum and stainless steel.
Most modern solar panels use MC-4 plugs (Universal Solar Connector) and cables to connect to each other in the PV array and transmit direct current (DC) electricity to the first BOS component in the chain.
Solar Inverter
Grid-connected, off-grid, or hybrid, all residential photovoltaic systems require a solar inverter to convert DC power from solar panels to alternating current (AC) household electricity for end-use with your home appliances.
Grid-tied systems without storage are designed to supplement — not replace — utility grid power.
PV modules send DC electricity directly to the inverter, which converts it to AC for immediate consumption or transmission to the power grid through a bidirectional (or smart) meter.
Many states, utilities, or power companies offer net metering billing programs that help offset the cost of your electricity bills by “selling” power your PV system generates in excess of consumption back to the grid.
Most early home solar power systems were grid-tied…
Today, many homeowners opt for off-grid or hybrid systems as solar battery storage technology has improved and costs have decreased.
There are many benefits of domestic solar batteries.
The most compelling for most is this:
Grid-tied systems without battery storage don’t work during blackouts.
An automated shut-off switch will keep your home solar power system offline for the duration of the power outage.
Charge Controller
In off-grid and hybrid solar systems, the DC electricity from PV modules is transmitted to the charge controller first — not the inverter.
Solar batteries store DC electricity, so there’s no need to convert the power to AC until it’s consumed.
A charge controller processes the raw DC power output of solar panels to optimize electricity generation, battery lifespan, and performance.
Without a charge controller, variations in voltage and amperage from unprocessed power would permanently damage or destroy sensitive battery cells.
MPPT solar charge controllers are the gold standard for residential photovoltaic systems, although PWM models are sometimes available despite offering suboptimal performance.
Solar Battery
Due to the intermittency of solar power, off-grid and hybrid photovoltaic systems require solar battery storage.
All renewable energy sources are intermittent.
Wind turbines don’t generate electricity on still days.
Solar panels don’t work at night.
Grid-tied solar power systems supplement — not replace — utility power and don’t require battery storage.
However, relying on grid infrastructure also negates many of the benefits of switching to solar.
Transfer Switch
Many solar generators — such as EcoFlow DELTA Pro 3 — have multiple inputs that allow you to connect your appliances and devices directly to the ports on the portable power station.
But if you’re using a solar generator for home backup or to save on Time-of-Use rates, integrating it with your home circuit board using an automatic transfer switch provides uninterrupted power.
EcoFlow’s Smart Home Panel 2 provides seamless home backup with the ultimate in monitoring and remote control from anywhere with an internet connection.
Together with EcoFlow DELTA Pro Ultra, it’s the industry-leading whole house solar generator.
Cables and Wiring
Most modern solar panels use MC-4 plugs to connect to each other and the inverter or charge controller.
However, some PV modules require wiring and soldering, which is usually better left to a professional installer.
Wiring Solar Panels in Series or Parallel
Connecting one or two portable solar panels to a portable power station is simple…
But arrays of 3 panels or more require some basic knowledge and planning.
How you wire solar panels together determines the voltage and amperage output.
If you misconnect PV modules, you can overload and permanently damage your system.
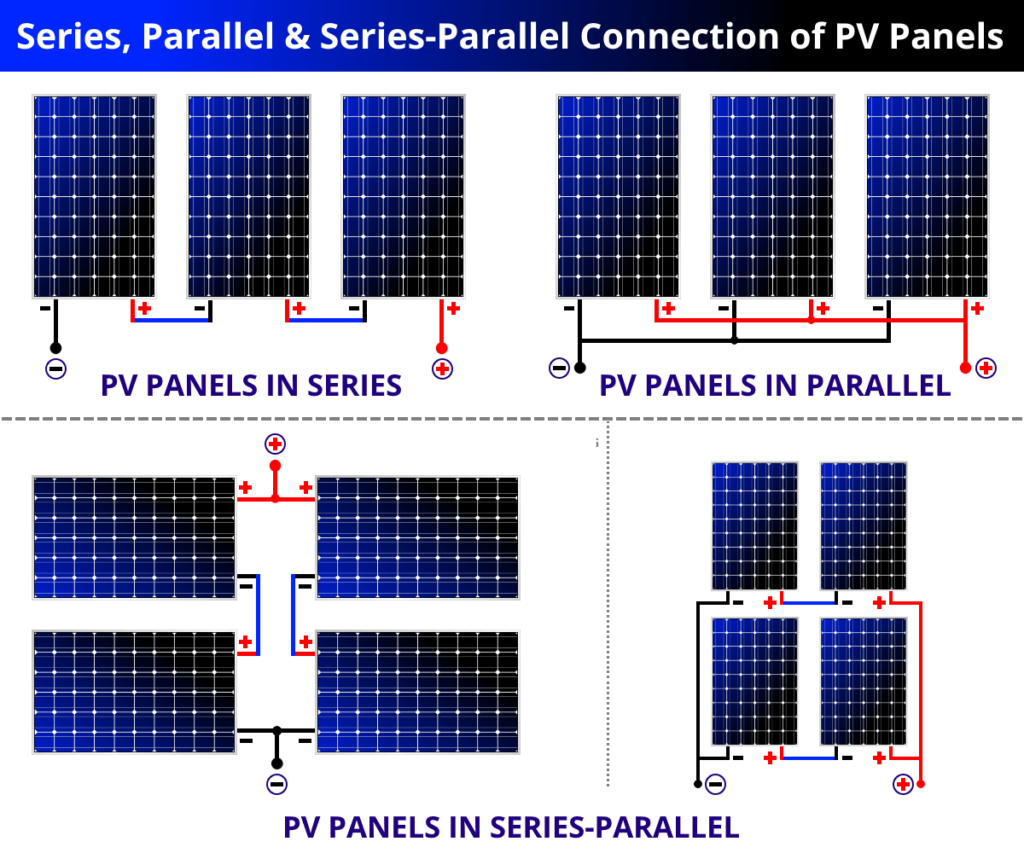
Here are the different methods of connecting solar panels.
(Source: Alternative Energy Tutorials)
Series Connections
To connect solar panels in series, wire the positive terminal of the first module to the negative terminal of the second panel and the positive terminal to the negative terminal of the third panel.
Continue wiring positive to negative until all the modules in the array are connected, then plug the final panel into your solar inverter or charge controller.
Connecting PV modules in series sums the voltage of each panel — the amperage remains the same.
For example, if you connect 3 x 400W rigid solar panels (31V/12.9A) in series, the maximum combined output is 1,200 watts, 93 volts, and 12.9 amperes.
Learn more about volts, watts, and amps.

(Source: Alternative Energy Tutorials)
Parallel Connections
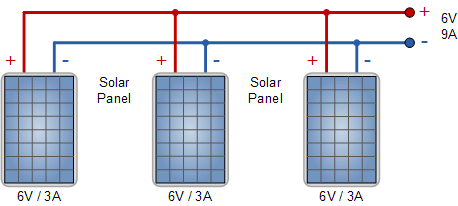
Wiring solar panels together in parallel sums the amperage (current) of each PV module while the voltage remains unchanged.
So, if you connect 3 x 400W rigid solar panels (31V/12.9A) in series, the maximum combined output is 1,200 watts, 31 volts, and 38.7 amperes.
As you may have guessed from the above examples, watts = volts x amps.
Connecting PV modules in parallel requires wiring all of the positive terminals of each panel together and doing the same for all the negative terminals.
The positive and negative terminals of the final solar panel in the array are then connected to your balance of system.

(Source: Electrical Technology)
Hybrid (Series/Parallel)
Wiring solar panels in series or parallel each has benefits, depending on your application.
However, a hybrid wiring plan will likely be required to optimize performance for large solar panel arrays of four PV modules or more.
Professional installers use solar panel wiring diagrams to plan the layout of PV modules, accounting for the unique characteristics of your rooftop and environmental factors that can impact the productivity of your array.
For example, depending on how your PV modules are connected, shade falling on one solar panel can reduce the entire output of the array, even if the other modules are unobstructed.
The physical act of connecting multiple solar panels is likely to be simple, but how they’re connected largely determines the array’s performance.
Learn more about connecting solar panels in series or parallel.
Tools and Materials for Solar Panel Installation
The tools and materials required for installing solar panels vary based on the type of PV modules you’re connecting and where they’re being mounted.
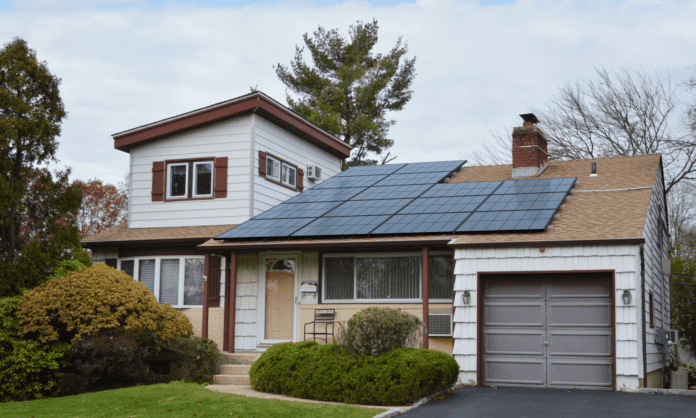
The vast majority of residential photovoltaic systems are powered by rooftop solar panel installations.
Here are the tools and materials you’ll need to install most rooftop solar panel arrays.
Tools
- Cordless Drill/Impact Driver: Used for creating pilot holes, driving screws, and securing mounting hardware to the roof structure.
- Socket Set: Various socket sizes are required to tighten bolts and nuts in mounting rails and panel connections.
- Wrench Set: Adjustable or combination wrenches are necessary for tightening and securing different hardware components.
- Level: Essential for ensuring that mounting rails and panels are aligned and level for optimal performance. You can use a spirit level or laser level.
- Tape Measure: Used for precise measurements of roof areas and panel placement.
- Chalk Line to mark straight lines on the roof to align mounting rails and other components.
- Wire Strippers/Cutters are used to prepare electrical wires by removing insulation and cutting them to the correct length. They are required to make safe and secure connections.
- Crimping Tool: Used for securely attaching connectors to electrical wires, ensuring a reliable and long-lasting electrical connection. Often used for MC4 connectors.
- Multimeter: Essential for testing voltage and current (amperage) at different points in the system, ensuring proper wiring and function. Crucial for verifying electrical connections.
- Safety Harness & Rope: Vital for fall prevention when working on rooftops. Ensure a secure attachment that allows for safe movement.
- Personal Protective Equipment (PPE): Work gloves, safety glasses, hard hat, and appropriate work boots help ensure your safety and protection.
- Panel Lifting Devices: Depending on the weight and number of panels, these may include suction cups, panel lifters, or a crane. Lifting devices are used to safely transport panels onto the roof without causing damage.
- Ladders or Scaffolding: For safe and secure rooftop access.
Materials
- Solar Panels: Photovoltaic modules that convert sunlight into electricity.
- Mounting Rails: Aluminum or steel rails are secured to the roof and provide a framework for attaching the solar panels, creating a level surface for panel mounting.
- Roof Mounts/Flashing: Specialized hardware to attach the mounting rails to the roof while ensuring a watertight seal. Designed to prevent water damage and leaks.
- Universal Solar Connectors (MC4): Weather-resistant connectors to wire the panels together. Specifically designed for solar panel connections.
- Wiring: UV-resistant electrical wiring for connecting panels, inverters, and other components. Use wiring and connectors specific to solar applications to withstand environmental conditions.
- Combiner Box: A junction box that combines the output of multiple strings of solar panels into one. Helps with wire management and connections.
- Conduit: Protective tubing for running electrical wires, safeguarding them from weather and physical damage. May be required to comply with electrical codes.
- Labels and Marking Tape: Used to identify wires, components, and circuit breakers for safety and future maintenance.
- Fasteners (Screws, Bolts, Nuts): Various types and sizes of fasteners to secure all the components together. Must be rust-resistant and suitable for outdoor use.
- Sealant: Weatherproof sealant used to seal penetrations and flashing around roof mounts, to prevent water ingress. It helps prevent water damage and ensures a long-lasting installation.
- Solar Generator or other balance of system: The combined output of the solar panel array connects to the charge controller (off-grid or hybrid system with battery storage) or solar inverter (for grid-tied systems).
What Are the Steps for Solar Panel Installation?
Here is a step-by-step guide for installing a hybrid (solar+storage) solar panel system for your home.
Because most residential solar power systems are mounted on a rooftop, we’ll focus on that here, but most of the steps below apply to any installation.
Phase 1: Planning, Preparation, and Purchase
- Assess Electricity Consumption and Output Requirements: Calculate your daily energy consumption in kilowatt-hours (kWh) by adding up the starting and running watts of all appliances and devices you want to operate simultaneously. Consider future needs as well. Estimating your electricity consumption should dictate the size of your solar panel array, solar battery storage capacity, and inverter output (in watts or kilowatts). It’s essential for purchasing a system that is neither under or over-sized.
- Design and Site Assessment: Evaluate your rooftop for optimal sun exposure. Determine PV module direction and placement to minimize shading and maximize sunlight capture during peak sun hours each day. Choose the optimal locations for your solar battery, inverter, and charge controller, factoring in temperature and ease of access.
- Component Selection and Purchase: Based on your electricity requirements, select solar panels, batteries (lead-acid or lithium-ion), charge controller, inverter (sized appropriately for AC output), wiring, fuses/circuit breakers, and mounting hardware. Ensure all components are compatible (voltage and current) and match your system’s needs. Choosing the right solar generator or other balance of system is essential for performance and longevity.
- Permitting & Safety Preparation: Obtain permits or approvals from local authorities if required. Establish a safe work area and gather all necessary safety equipment, such as hard hats, gloves, safety glasses, and power tools. Safety is of paramount importance during all phases of solar panel installation.
Phase 2: Physical Installation
- Mounting System Installation: Securely install the mounting system for the solar panels on your roof. Ensure the roof mounting hardware is attached to rafters or trusses for a durable and weatherproof installation. Ground mounts also require secure anchoring.
- Solar Panel Installation: Lift and secure solar panels onto the mounting rail system. Connect them in series or parallel to match your system’s voltage and current (amperage) requirements. Follow the manufacturer’s instructions or a professionally designed wiring plan. Secure all connections. Take care while lifting panels as they can be heavy and cumbersome.
- Charge Controller Installation: If you’re using an EcoFlow DELTA series solar generator, all the balance of system components you need are built-in. If you’re using separate parts, install the charge controller, and connecting the solar panel array. Then connect the PWM or MPPT charge controller to the solar battery bank.
- Solar Battery Setup: Install the battery bank in a well-ventilated, protected area. Lead-acid batteries may require routine maintenance and have additional safety instructions. Lithium-ion battery types like lithium iron phosphate (LFP/LiFePO4) require no maintenance and can be installed anywhere in the home or in sheltered outdoor conditions. If using multiple solar batteries, connect them according to the manufacturer’s instructions to avoid dangerous shorts.
- Inverter Installation (60-70 words): Mount the solar inverter in a convenient and accessible location, preferably in a dry area close to the batteries. Connect the DC outputs from the solar battery to the inverter’s DC input terminals. The inverter converts direct current (DC) to alternating current (AC), often called household electricity.
Phase 3: Home Wiring and Testing
- Home Wiring Integration: Unless you’re using a standalone solar generator like EcoFlow DELTA 3 Plus — which has multiple inputs built into the unit for direct connection of appliances and devices — you’ll want to integrate your system with your home circuit board and wiring.
- Unless you are a licensed electrician, do not attempt to DIY install an automatic or manual transfer switch between your balance of system and home circuit board.
Working with high-voltage electricity can be deadly and connecting a solar generator to your home wiring requires the services of a professional.
- System Testing: After completing all connections, carefully test each component and the entire system to ensure it’s functioning correctly. Use a multimeter to check voltages and currents between separate components. Once your setup is tested, begin using your system as intended. Careful monitoring during initial use is essential to ensuring your system is operating as planned.
- System Monitoring: Monitor the performance of your off-grid system regularly. Maintain your solar batteries and other components as recommended by the manufacturer. EcoFlow solar generators have extensive remote monitoring and control built-in. You can access the unit from anywhere with an internet connection using the EcoFlow app.
EcoFlow DELTA Pro 3 and DELTA Pro Ultra integrate seamlessly with your home circuitry using Smart Home Panel 2 for next-level monitoring and performance.

Frequently Asked Questions
The procedure for installing solar panels varies based on the type of PV module. For example, portable, rigid, or flexible solar panels. Portable solar panels can be set up and plugged into a compatible portable power station in minutes. Rooftop solar panel installations require significantly more planning and work, but most modern systems can be set up by someone with basic to intermediate DIY skills.
Most modern solar panels are relatively easy to install for someone with basic to intermediate DIY skills. However, if you’re installing a PV module array with more than 2 or 3 panels, it is typically best to work with a professional. Mounting and wiring large solar panel arrays and balance of system components like solar inverters and batteries requires a considerable amount of expertise to achieve optimal performance.
Final Thoughts
No matter your solar energy goals, installing the right type of solar panels in the optimal position for your location is necessary to help you achieve them.
EcoFlow offers a wide variety of high efficiency solar panels and whole-house solar generators like EcoFlow DELTA Pro Ultra, which can power almost any home.
From camping, to road trips, to whole home backup, EcoFlow has a solar solution for you.
Check out our selection today.
